
MQTT Connections settings in the app.
After you download the app, go to the menu in MQTT Connections and configure the connection to the broker.
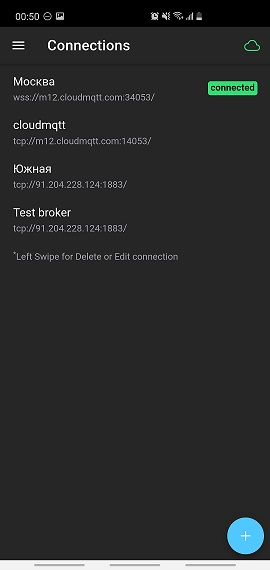
The app stores an unlimited number of connections to brokers, which allows you to quickly switch between them.
To create a new connection, tap the " + " sign in the lower-right corner of the screen.
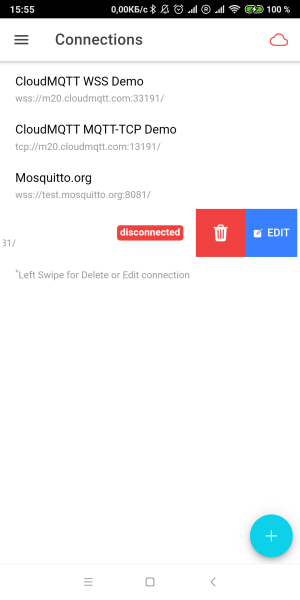
If you need to edit an existing one, pay attention to the label at the bottom about the left swipe. After it, a menu will appear, as shown in the picture below.
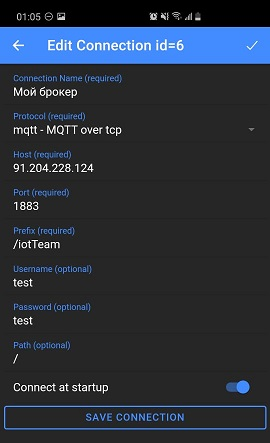
- Connection name — the name of your connection, can be anything
- Protocol is the type of connection to the broker
mqtt — Mqtt Over Tcp is not a secure connection to the broker over tcp ip (supported on android)
wss-Web Socket Secure is a secure connection to the broker via Websockets (supported on android and iphone)
- host-the broker's url or ip address
- port — the broker's port, please note that Web Socket Secure usually uses a different port
- prefix — any English word, such as /IoTmanager, must start with a slash. This is necessary in order to differentiate between users of the same broker. For example, when many users connect to one broker, you need to come up with your own individual prefix for each of them, and then users will not interfere with each other. Please note that the prefix field can only consist of one word and one separator: /prefix. The option like: /prefix1/prefix2 will not work. After changing the prefix field, you must restart the device.
- username — the user's name
- password — the password
- parth — can be left unchanged
After entering the settings correctly, the app will connect to the broker. The cloud will turn green. Next, you can go to the Dashboard, where widgets will appear after connecting devices.